Main Unit
Front
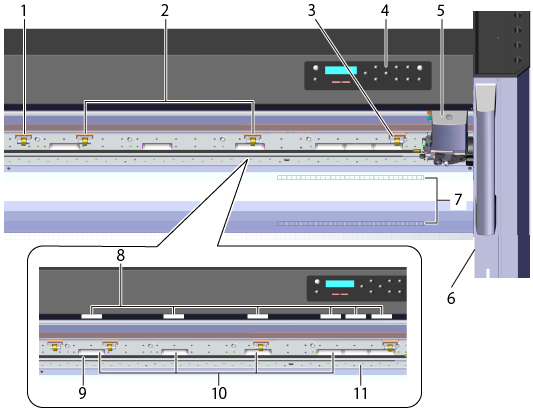
| Number | Name | Description |
| 1 | Left pinch roller | To raise or lower this part, press [PINCH]. This part lowers to pinch the material. Set this at the left edge of the material. |
| 2 | Middle pinch rollers (the number of which varies depending on the size of the machine) |
To raise or lower these parts, press [PINCH]. These parts lower to pinch the material. Set these in the middle of the material. |
| 3 | Right pinch roller | To raise or lower this part, press [PINCH]. This part lowers to pinch the material. Set this at the right edge of the material. |
| 4 | Operation panel | Use the display and the keys to operate and set this machine. |
| 5 | Cutting carriage | Install the blade holder. This part moves to the left and right to cut the material. |
| 6 | Power switch | Turns the machine's power on and off. |
| 7 | Ruler | Set the material in place so that its right edge is aligned with the front and back rulers. |
| 8 | Grit pattern | These indicate the locations of the grit rollers. When loading the material, be sure to place the pinch rollers within the area indicated by each of these patterns. |
| 9 | Blade protector | This protects the tip of the blade during cutting. |
| 10 | Grit rollers | These rollers feed the material to the front and rear. |
| 11 | Platen | This is the path over which the material passes. A suction fan that keeps the material from coming loose is built in. |
Back
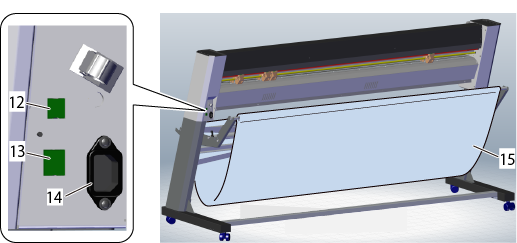
| Number | Name | Description |
| 12 | USB connector | This is for connecting a USB cable. |
| 13 | Ethernet connector | This is for connecting an Ethernet cable. |
| 14 | Power-cord connector | This is for connecting a power cord. |
| 15 | Material basket | This receives and stores the material that is cut from the roll. |
Operation Panel
Use this to set and operate the machine.
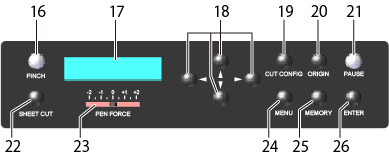
| Number | Name | Description | Notation used in this document |
| 16 | PINCH key | Use this to raise and lower the pinch rollers. Use this when inserting or removing the material. When the pinch rollers are lowered, this key lights. |
[PINCH] |
| 17 | Display | This displays various setting menus and other information. | - - - |
| 18 | Cursor keys | You use these to select settings for menu items, to move the material, and for other such operations. | [ [ |
| 19 | CUT CONFIG key | Use this to set cutting conditions such as the blade force and the cutting speed. Perform a cutting test to check the conditions you have set. |
[CUT CONFIG] |
| 20 | ORIGIN key | Use this to set the origin to the current blade position. Hold down this key for one second or longer. |
[ORIGIN] |
| 21 | PAUSE key | This pauses printing operation. Press it again to restart operation. This lights when operation is paused. |
[PAUSE] |
| 22 | SHEET CUT key | Use this to cut the material from the roll. Hold down this key for one second or longer. | [SHEET CUT] |
| 23 | PEN FORCE slider | Use this to fine-tune the blade force. You can even perform this adjustment while cutting is in progress. | - - - |
| 24 | MENU key | The message on the display changes each time that you press this key. The display switches in the following order: currently set cutting conditions → menu mode → width display screen. | [MENU] |
| 25 | MEMORY key | Use this key to apply recorded cutting conditions to the settings of the machine and to record the current setting values to the machine. | [MEMORY] |
| 26 | ENTER key | You use this for such tasks as enabling setting values. | [ENTER] |